In The App
How to register the tempCube and connect it to a WiFi network?
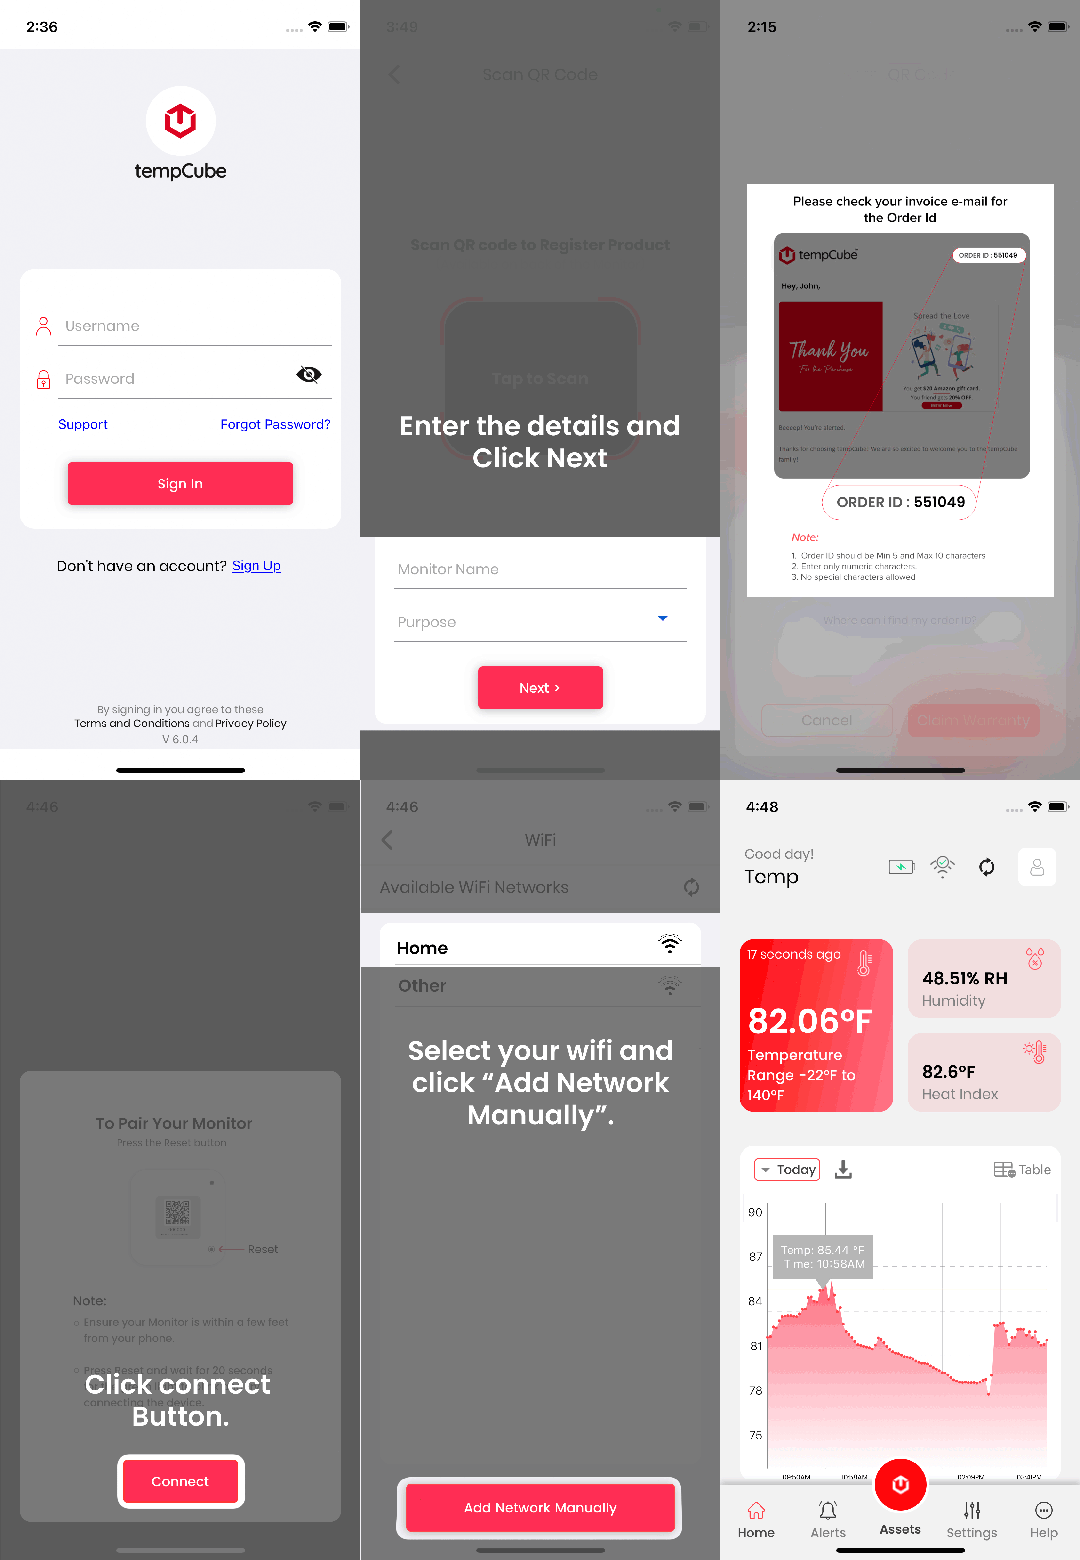
- Click sign up.
- Fill in your details and sign up.
- Tap and scan the QR code at the back of your tempCube.
- Enter your monitor's name and Purpose.
- Click Next.
Claim Warranty:
- A claim warranty pop-up appears. Click Get it Now.
- Choose the purchase source of your tempCube ( I.e., tempcube.io/ Amazon/ Walmart/ others).
- To know your order ID click “Where can I find the order ID".
- Now enter your ID.
- Click “Claim Warranty”.
- A warranty pop up shows on your screen.
- Click “Done”
- If you miss the warranty pop up, email support@tempcube.io
To Configure tempCube:
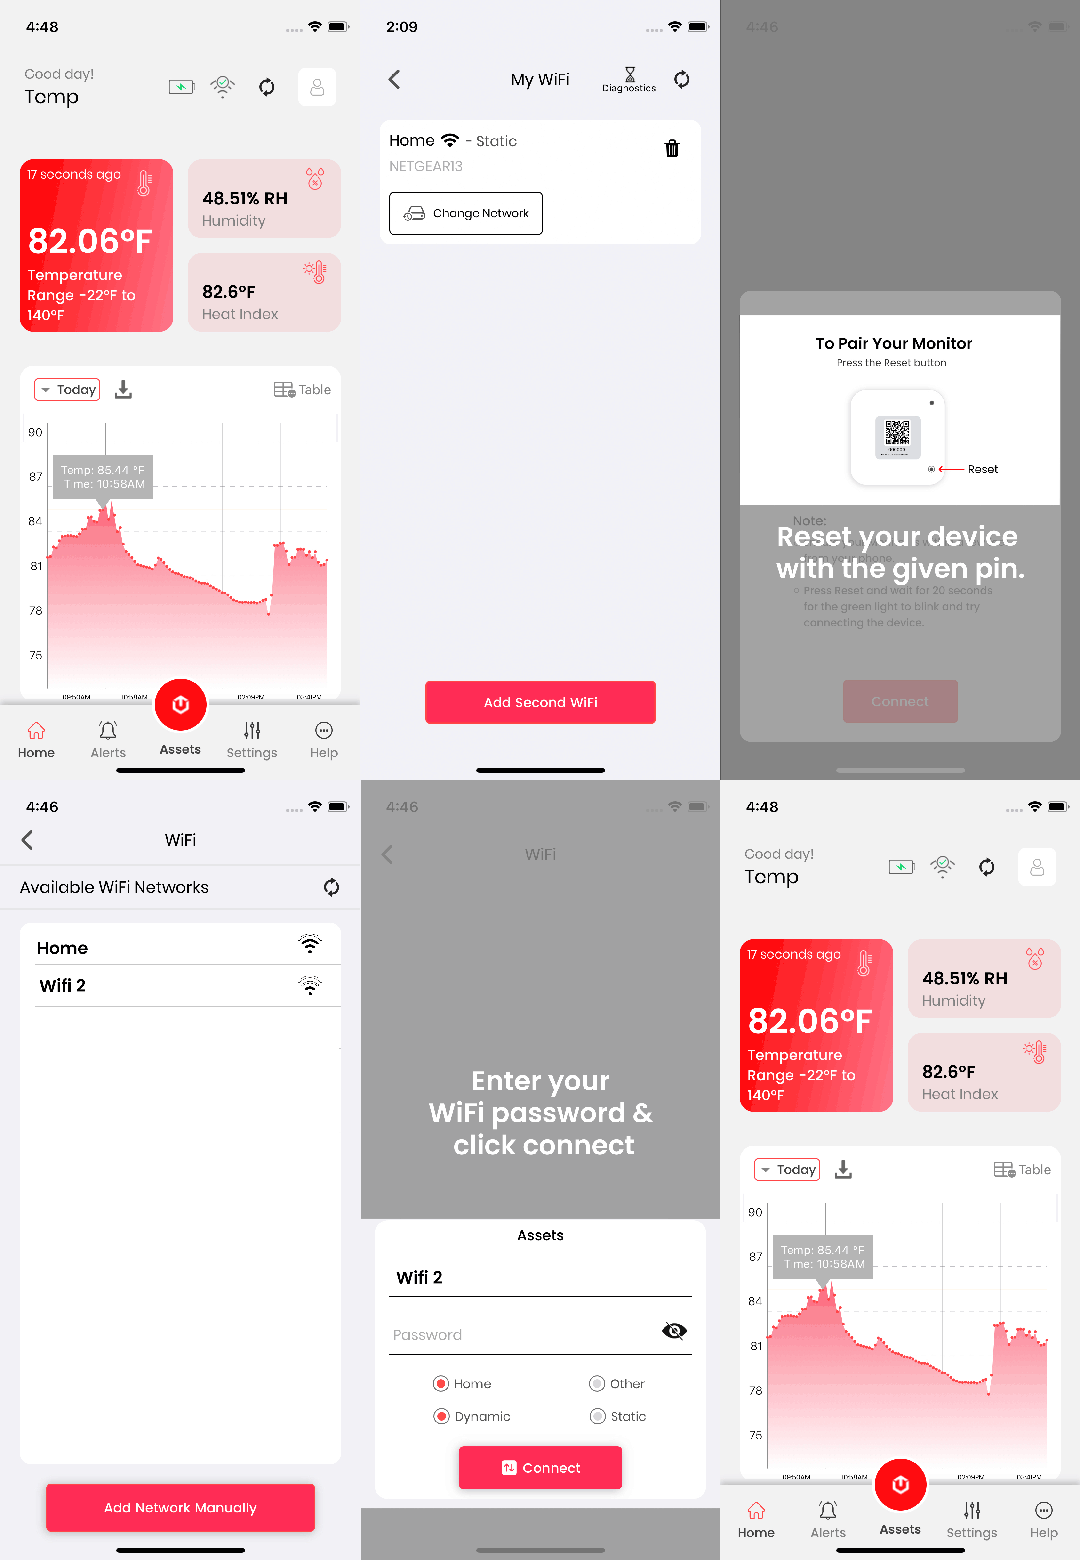
- To pair your monitor, rest your device with the given pin
- click connect button
- To connect your monitor, please get closer to your device
- Discover the available Wi-Fi network
- Choose the available Wi-Fi network and Add the network manually (e.g., Home/Office/others)
- Set the Assets
- Enter your Wi-Fi password and click connect
- Your Wi-Fi connection is successfully set up
To add the second Wi-Fi network:
Click Yes if you want to add a second Wi-Fi network, or else click No Hurray! Your tempCube is ready to use
How to get the Temperature report?
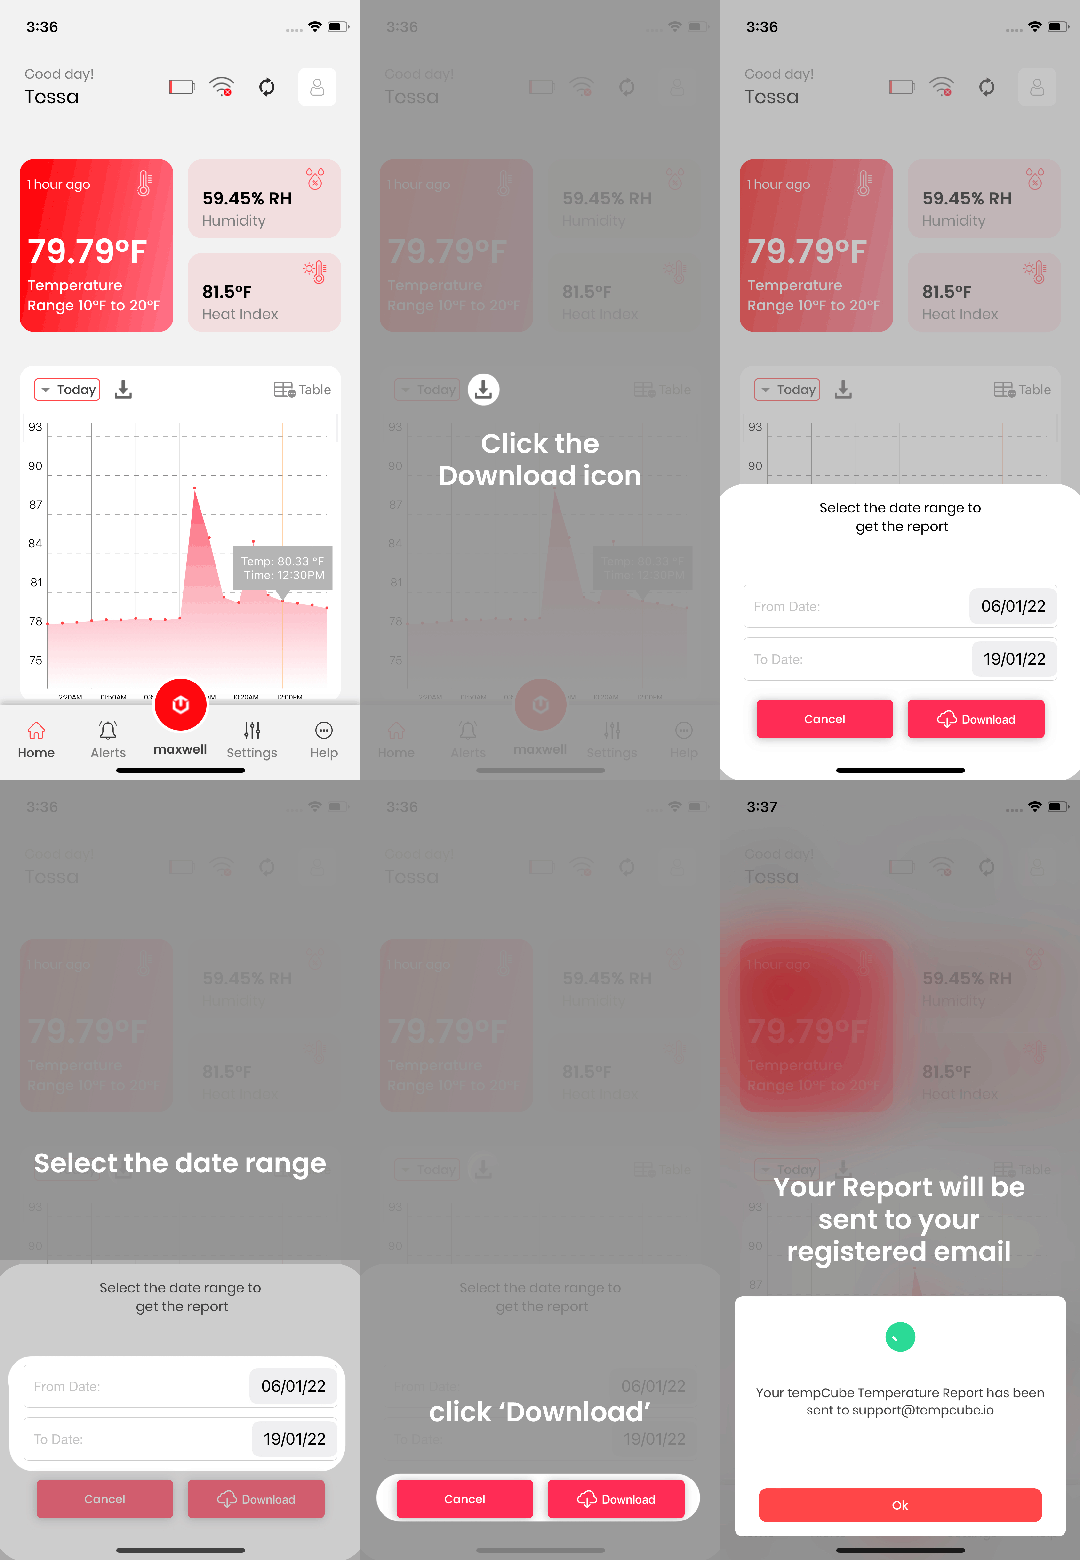
- Go to Home.
- Find the temperature/humidity graph.
- Click .
- Select the data range to get the report.
- Download the report.
How to change the Minimum and Maximum alert temperature?
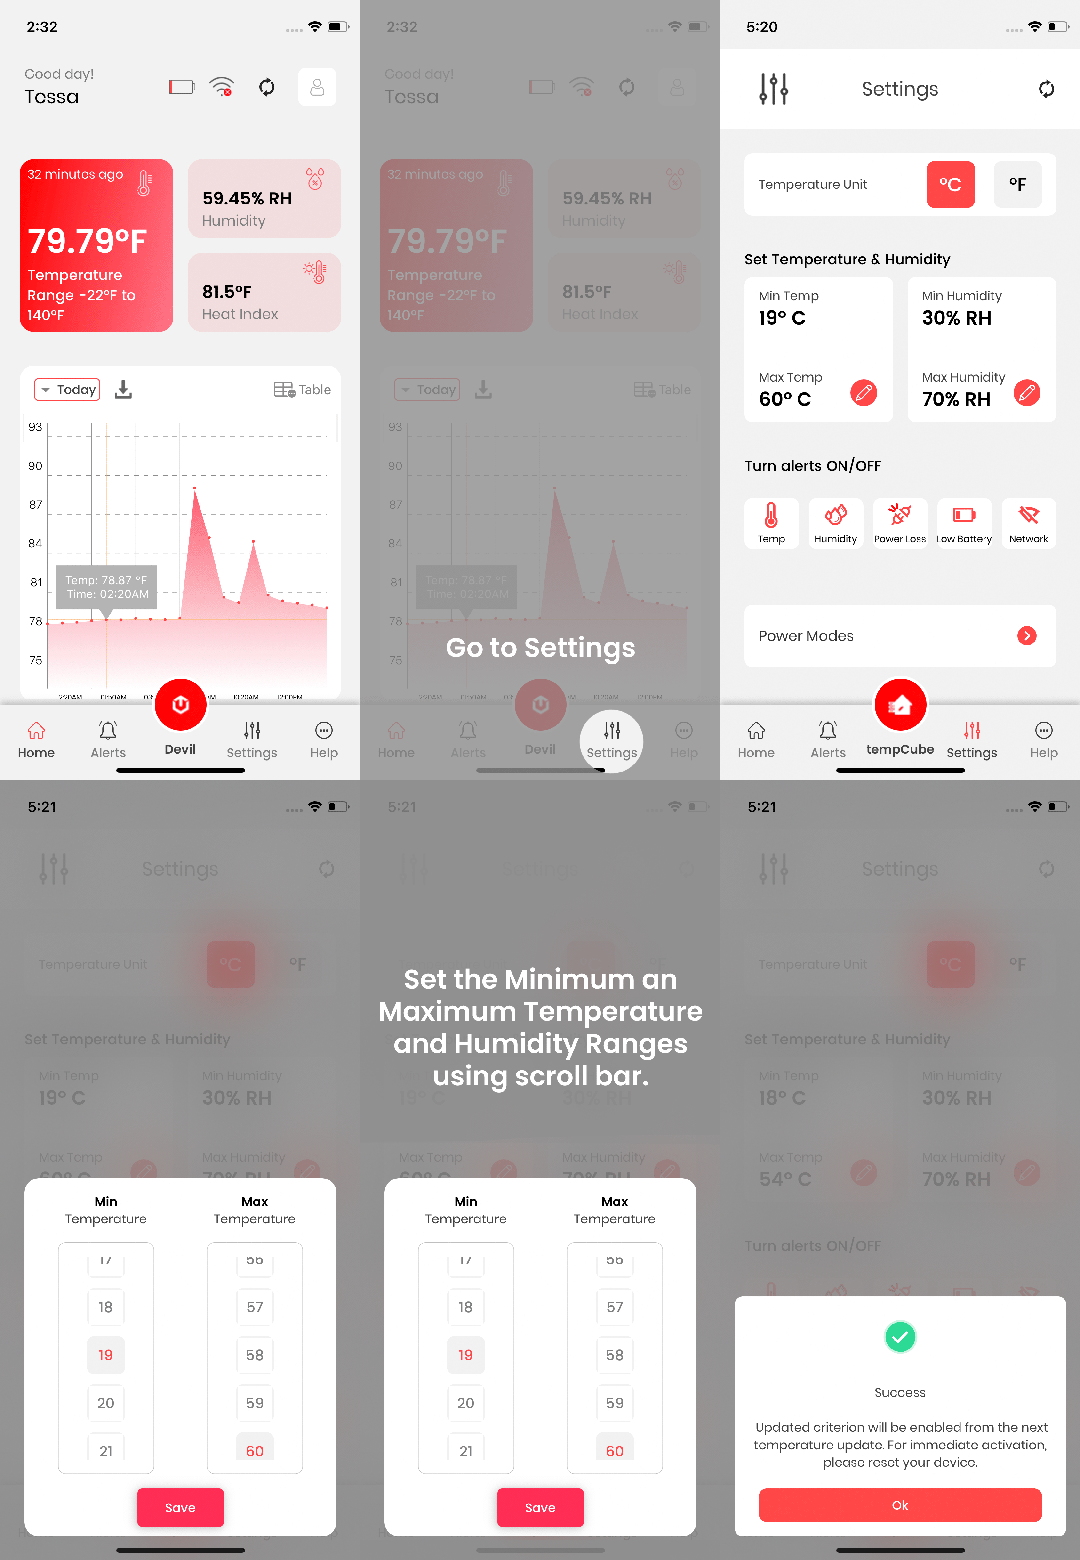
- Tap onSettings
- Under ‘Set Temperature & Humidity’, click the icon
- Set the Minimum and Maximum Temperature and Humidity Ranges using scroll bar.
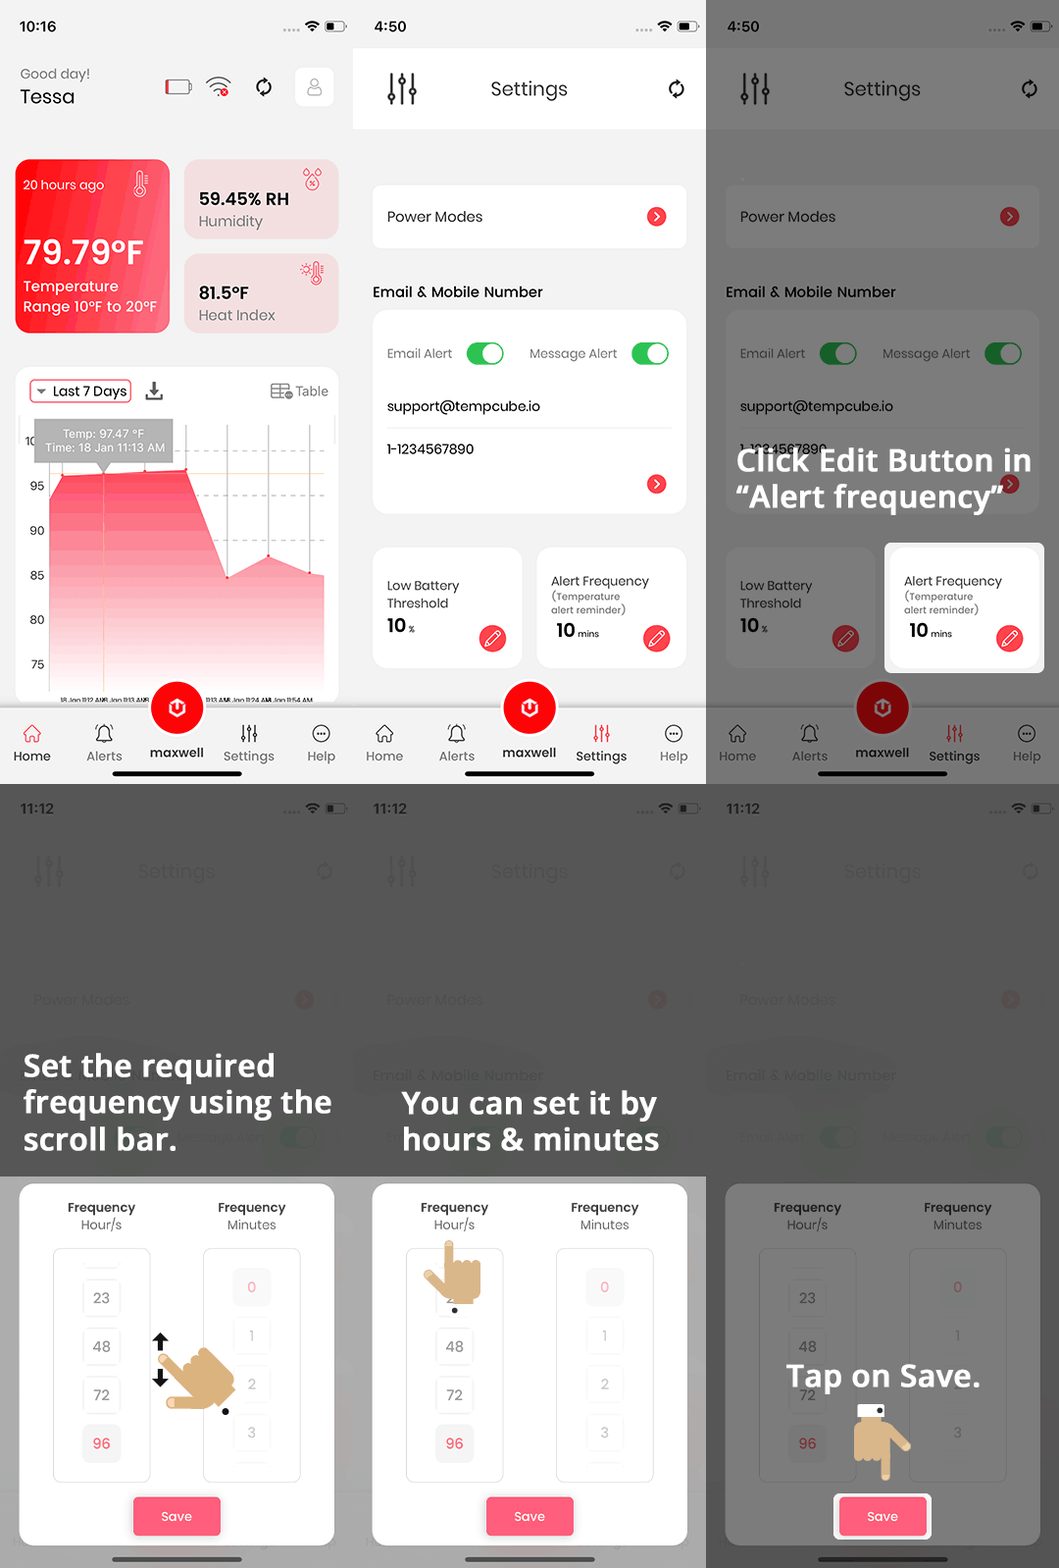
How to set/change the Alert frequency?
- Tap on Settings .
- Scroll down and Tap on Alert frequency.
- Set the required frequency using the scroll bar.
- You can set it by minutes, hours, and day.
- Tap on Save.
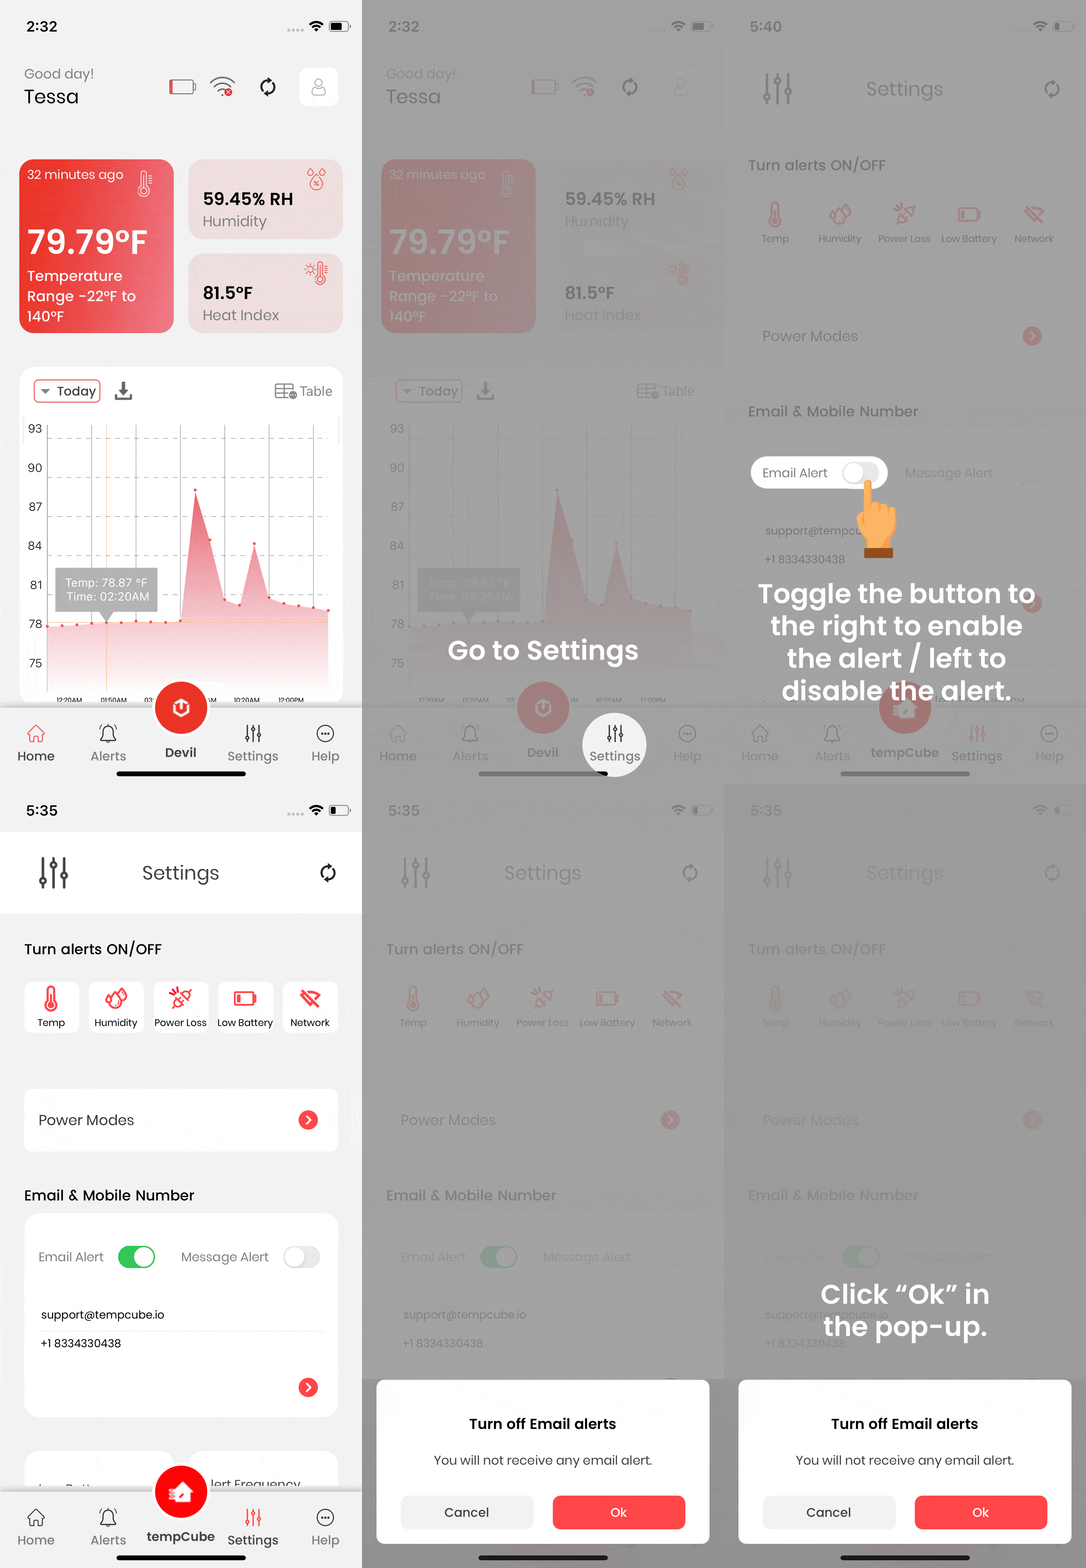
How to Enable and Disable the Email alert?
- Tap on Settings .
- Scroll down to the "Email Alert" to edit.
- Toggle the button to the right to enable the alert / left to disable the alert.
- Click “Ok” in the pop-up.
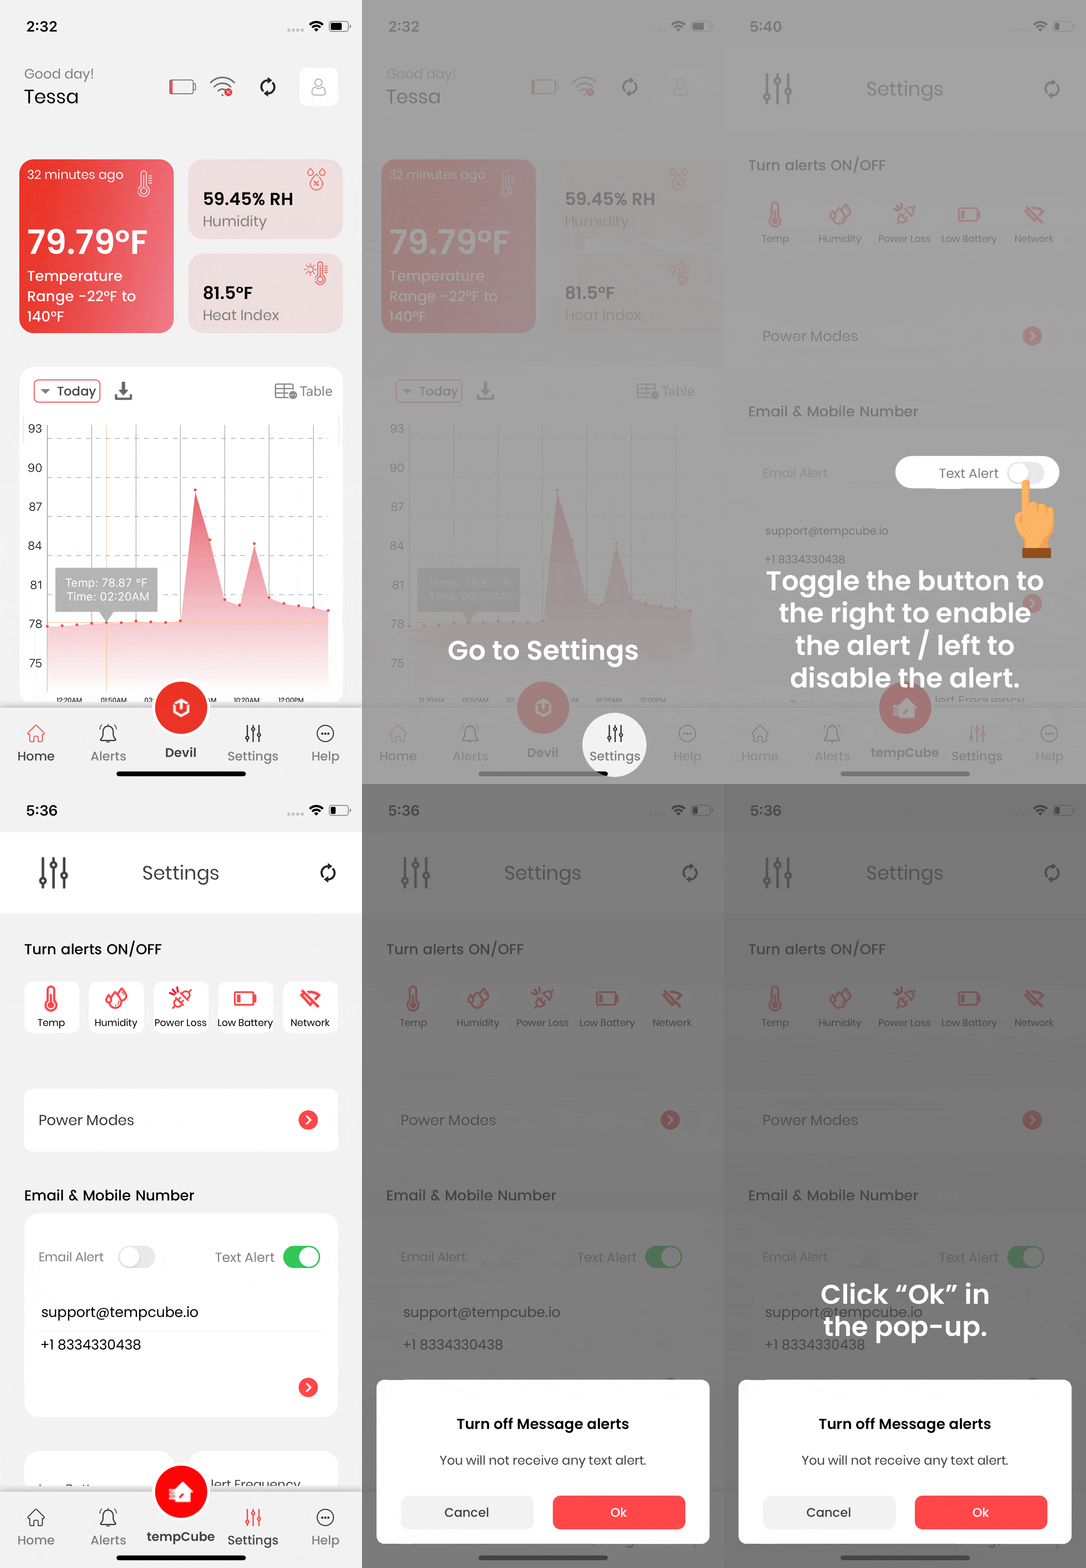
How to Enable and Disable the Text alert ?
- Tap on Settings .
- Scroll down to the "Text alert" to edit.
- Toggle the button to the right to enable the alert / left to disable the alert.
- Click “Ok” in the pop-up.
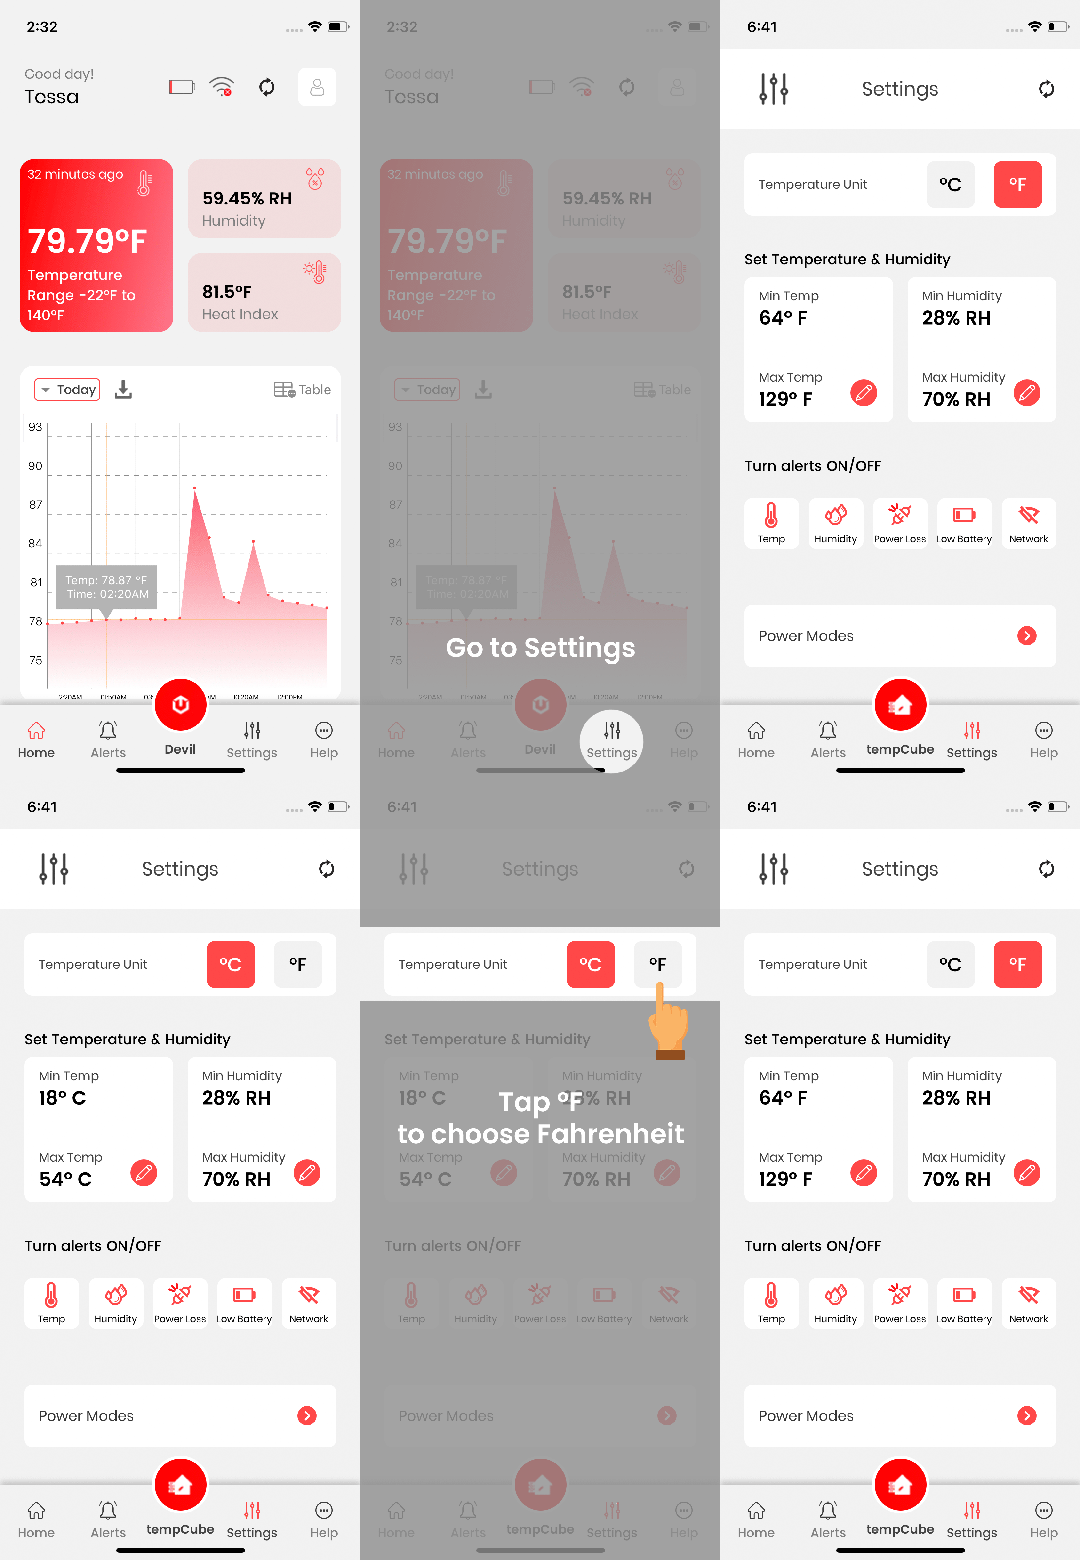
How to change the Temperature unit?
- Tap on Settings .
- Tap on the Temperature Unit.
- Toggle the button to °C to choose Celsius or °F to choose Fahrenheit, respectively.
- Click Ok in the pop-up.
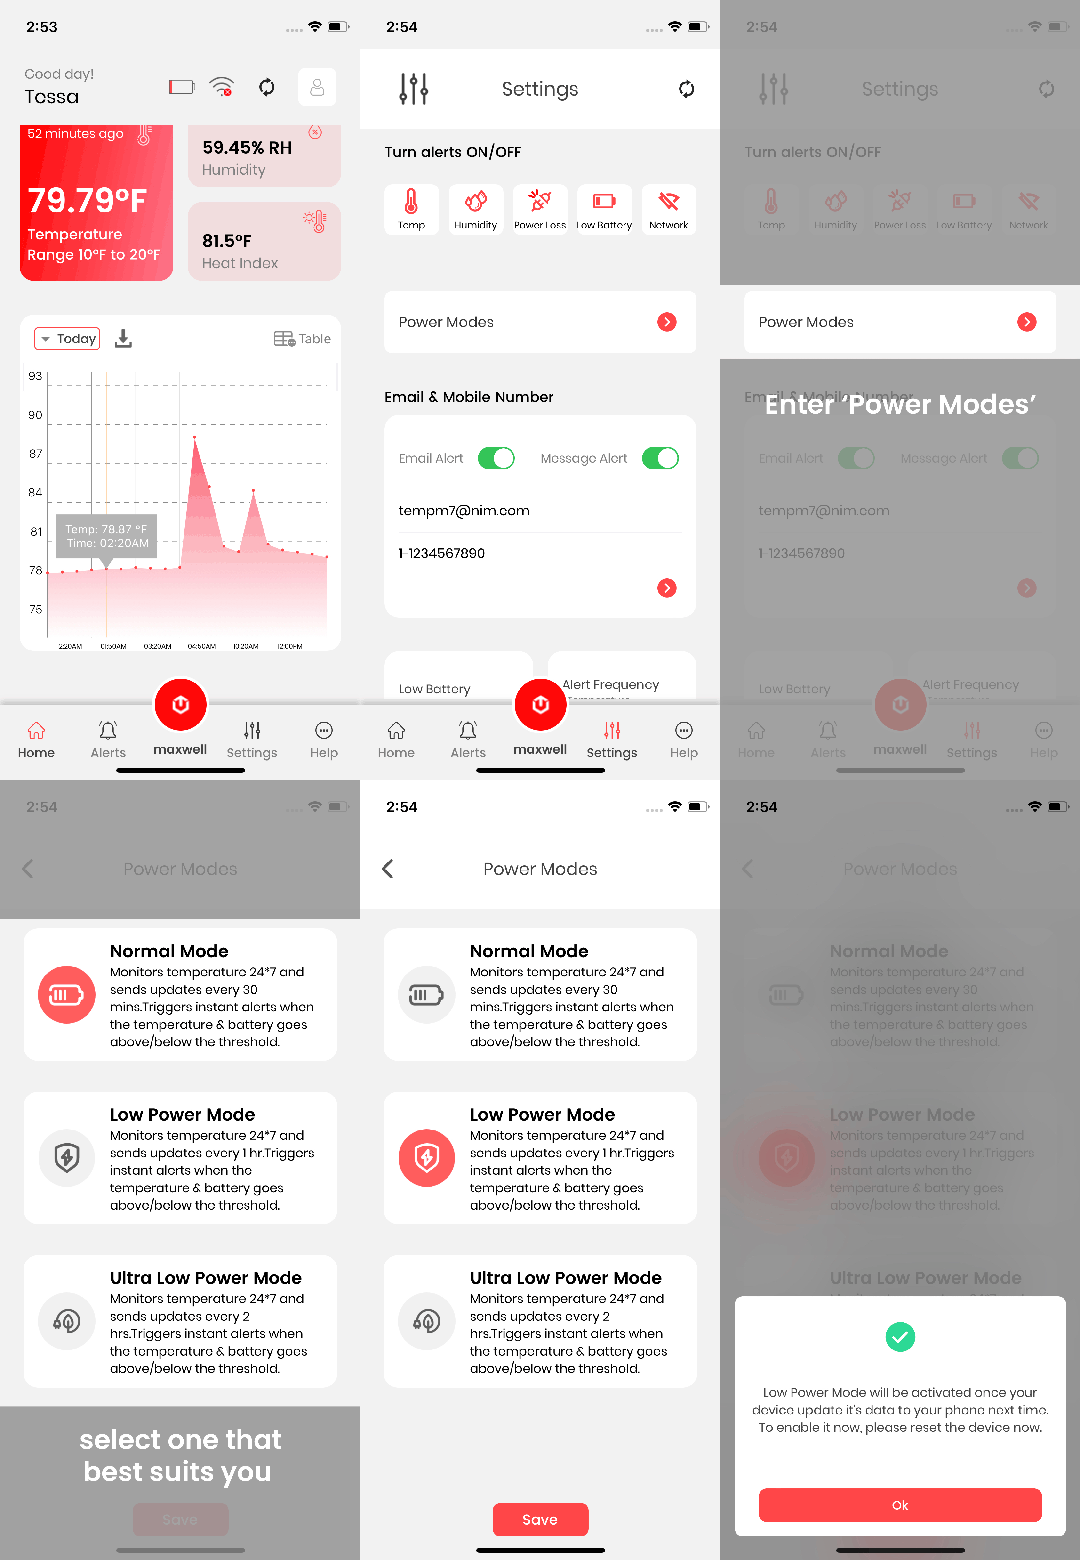
How to change the reporting interval?
- Go to Settings
- Enter ‘Power Modes’
- From the 3 modes, select one that best suits you and click ‘Save.’
(Note: The changes will be reflected in the next reporting interval.)
How to delete the saved WiFi network?
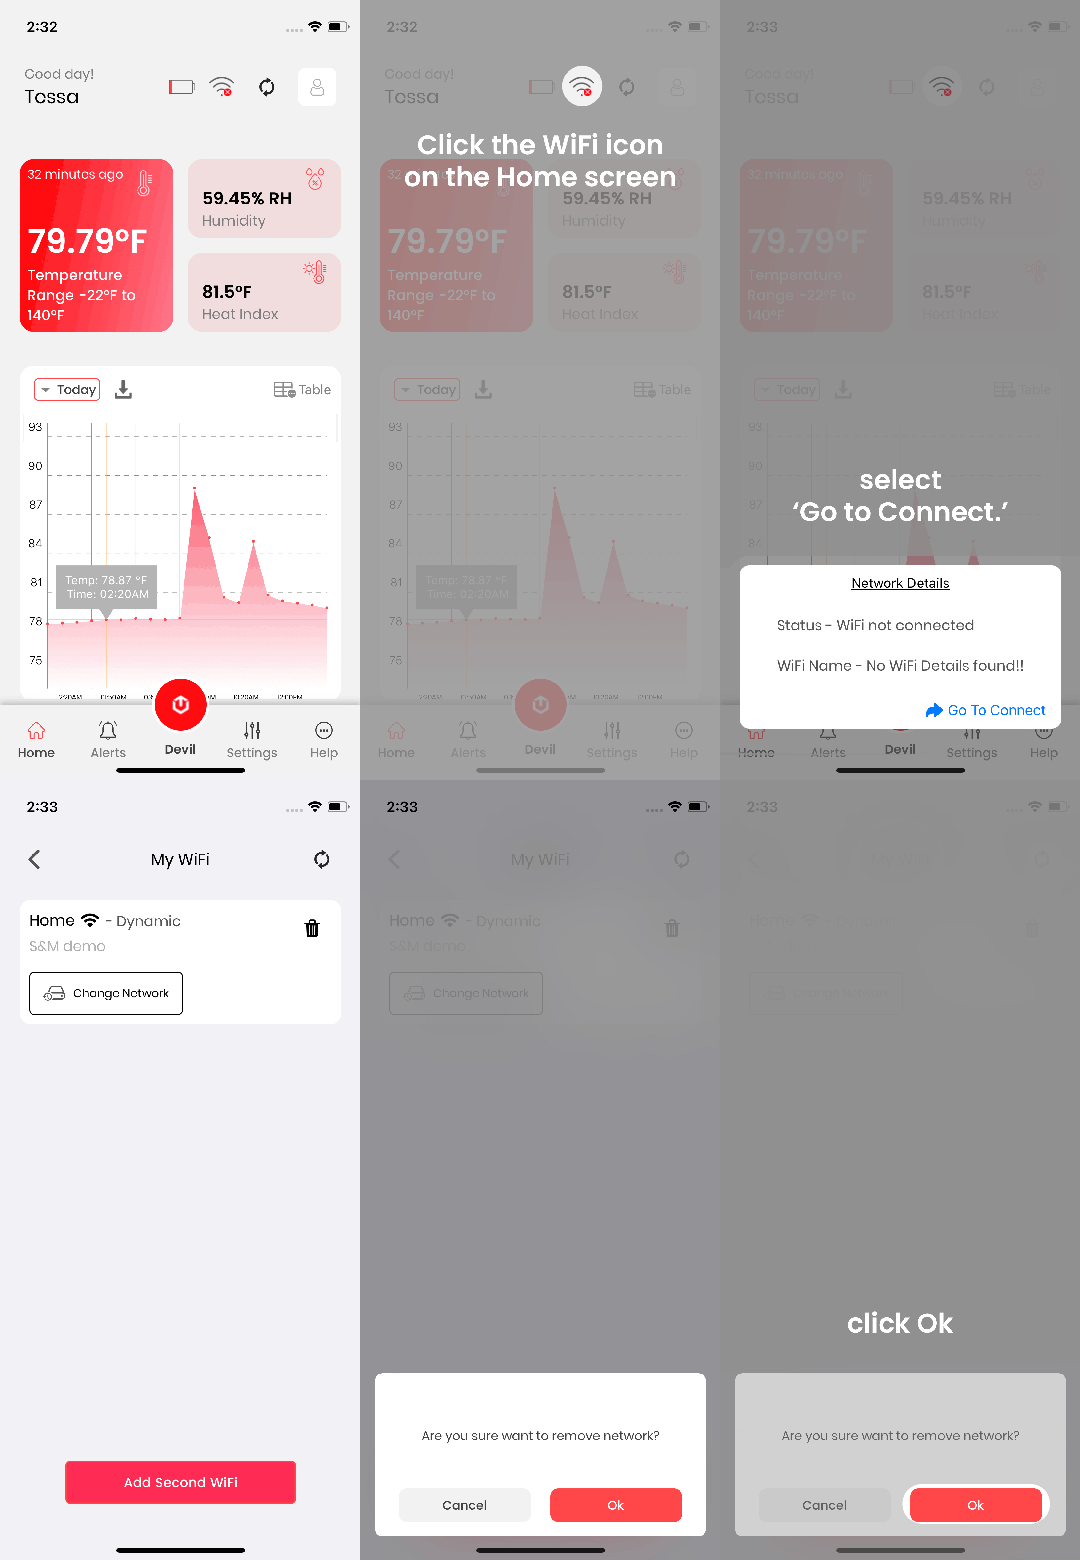
- Click the WiFi icon on the Home screen and select ‘Go to Connect.’
- Choose the network you want to delete from the saved network(s) and click the Trash icon. The saved network will be deleted on the next reporting interval.
(Note: You can only save up to 2 WiFi networks)
How to register more than one tempCube monitor to the app?
Setting up a new device is easier than your first one.
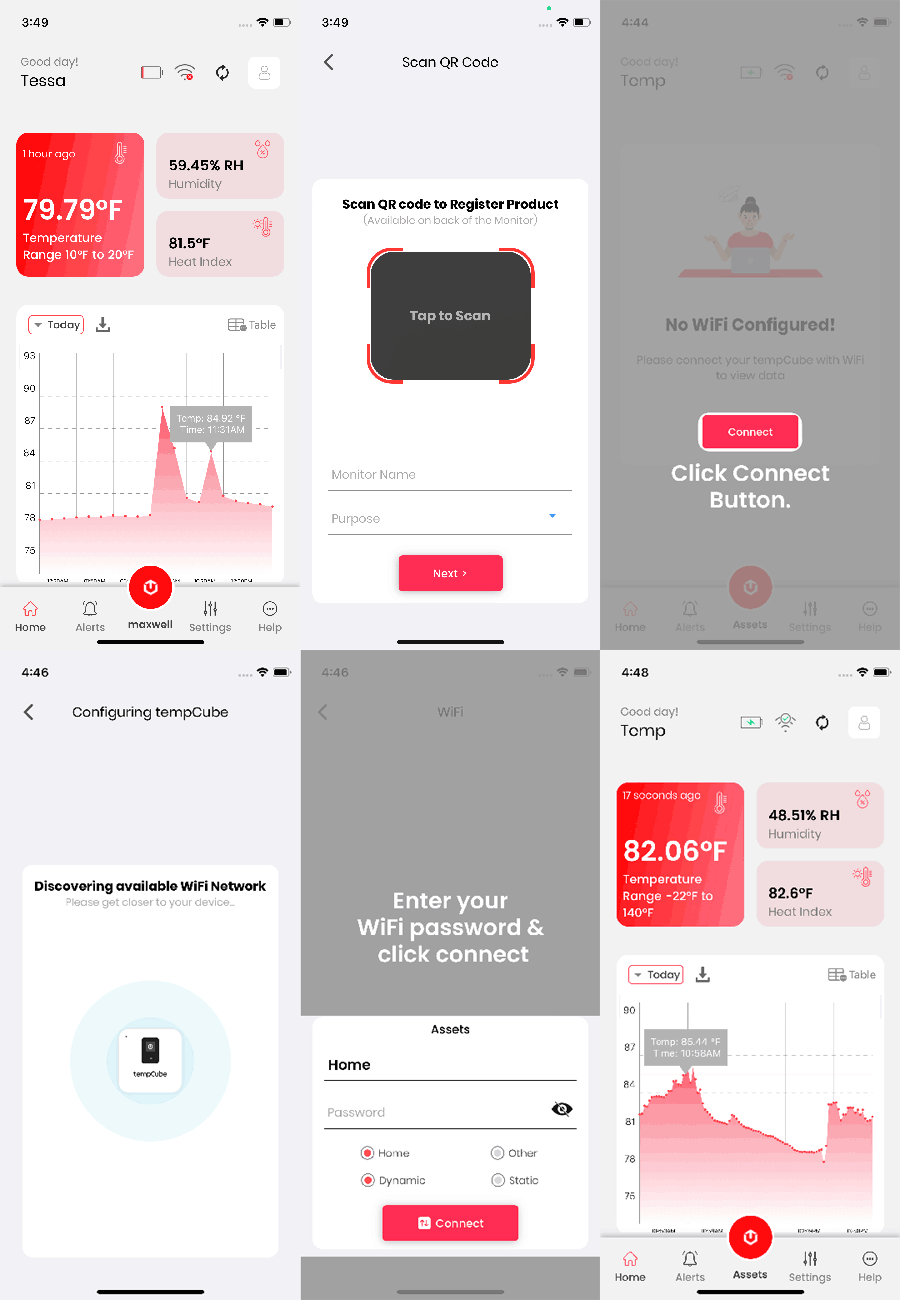
- Go to Home
- Click User Profile
- Click ‘Add Monitor’
- Scan the QR Code at the back of your tempCube.
(To claim your device warranty, choose your marketplace and insert the Order ID.) - Now, the app will ask you to pair your device. Ensure your device is within a few feet from your phone and reset using the eject pin.
- After pressing Reset, wait for 20 seconds for the green light to blink and click ‘Connect.’
- Once your device is deducted, select the WiFi network you need to connect with and enter the password.
Note: A dynamic IP will only ask for the password. Select the WiFi network for Static IP, enter the password, IP address, and hit ‘Connect.’
You have successfully added a new device and are all set to monitor temperature and receive alerts!
How to Enable and Disable all alerts?
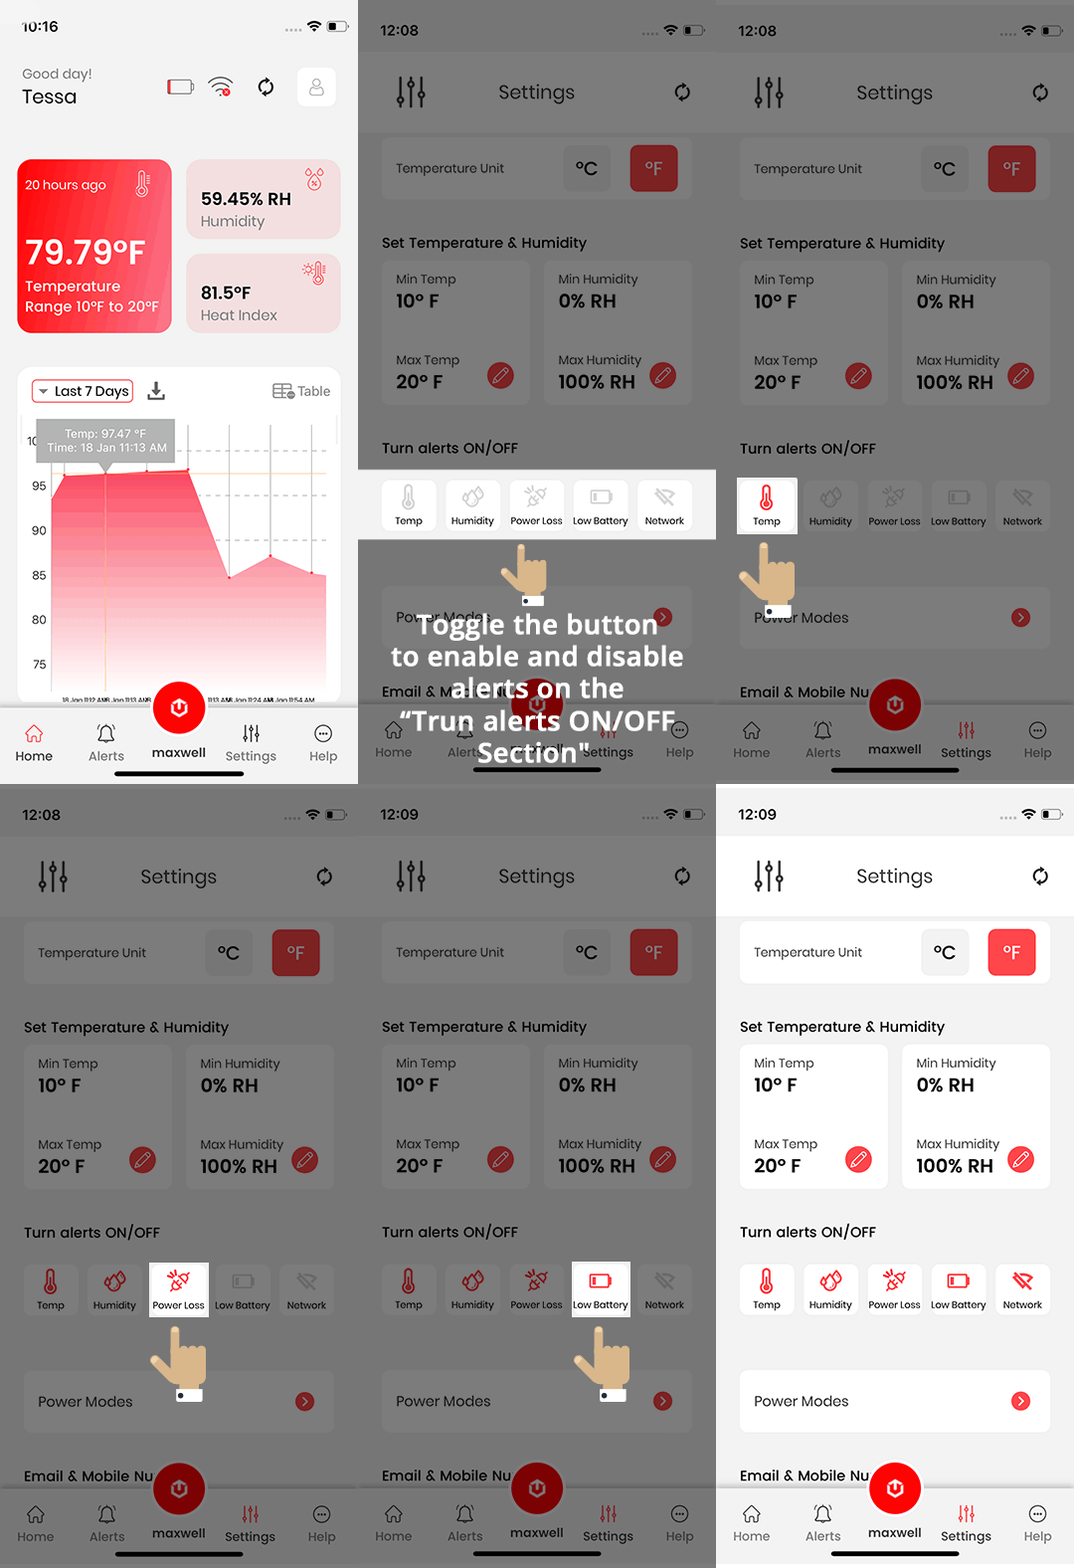
- Tap on Settings .
- Tap the individual alerts icons to enable and disable.
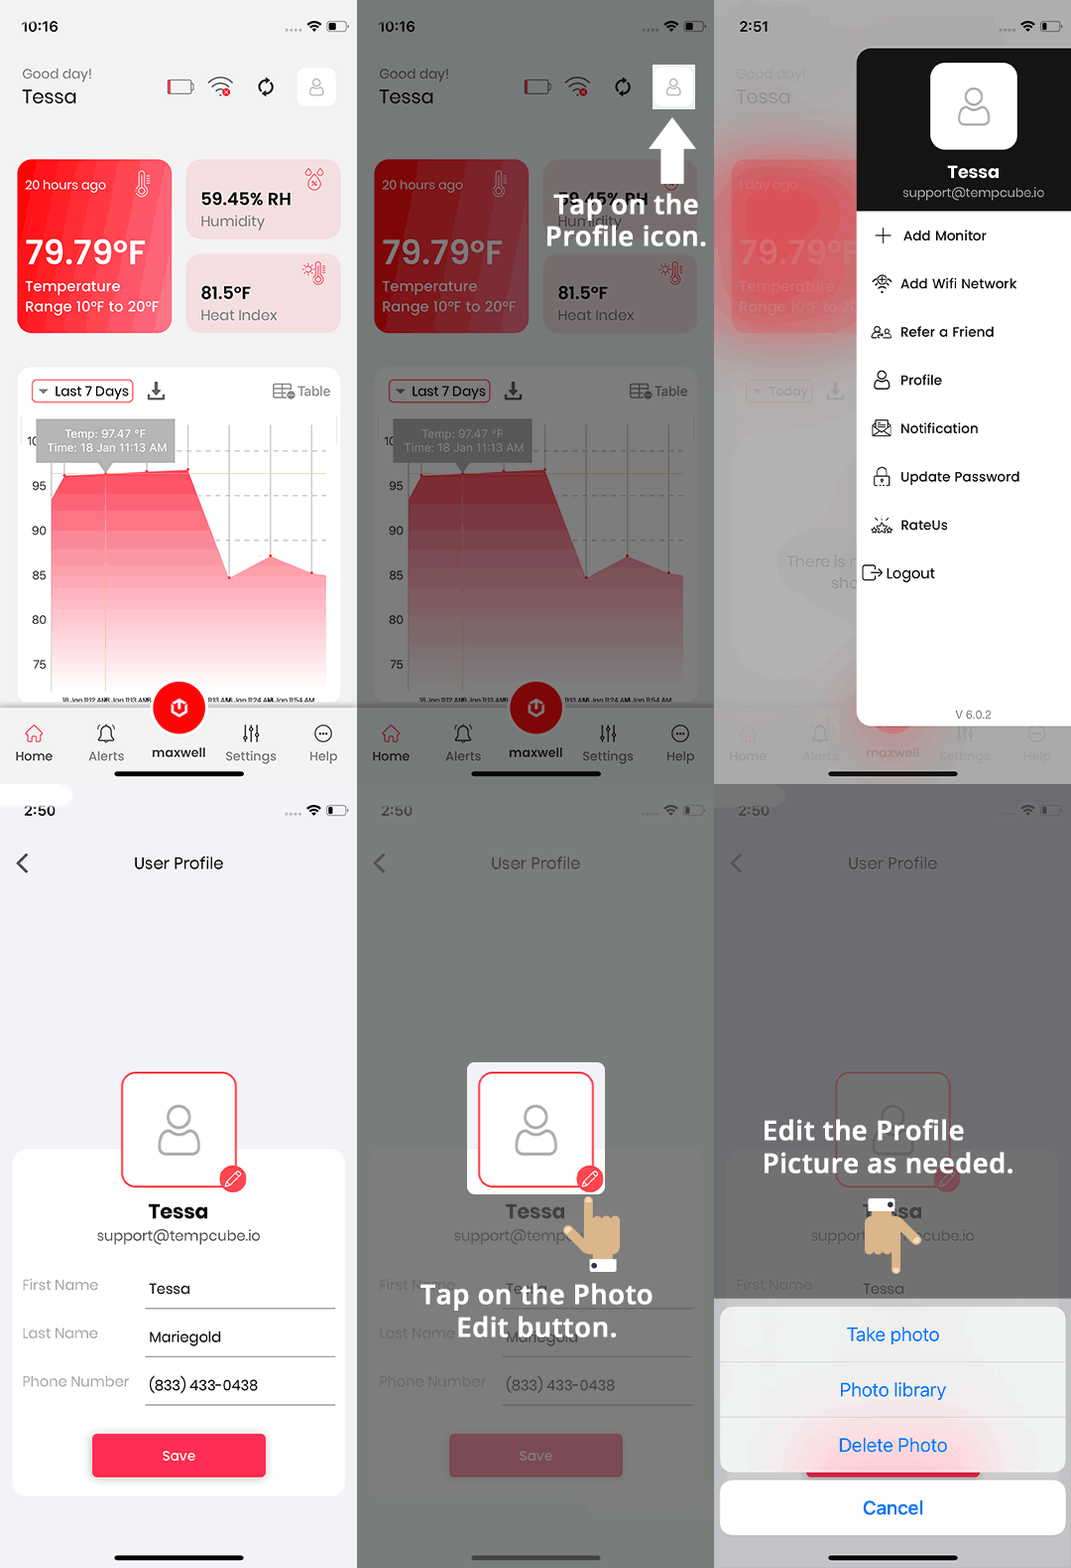
How to add and edit Profile Picture?
- Go to Home.
- Tap on the profile pic.
- Select profile.
- Add your profile pic.
- Click save.
What does the Refresh icon mean in the App?
This feature helps to get the last reported or updated data sent by your tempCube.
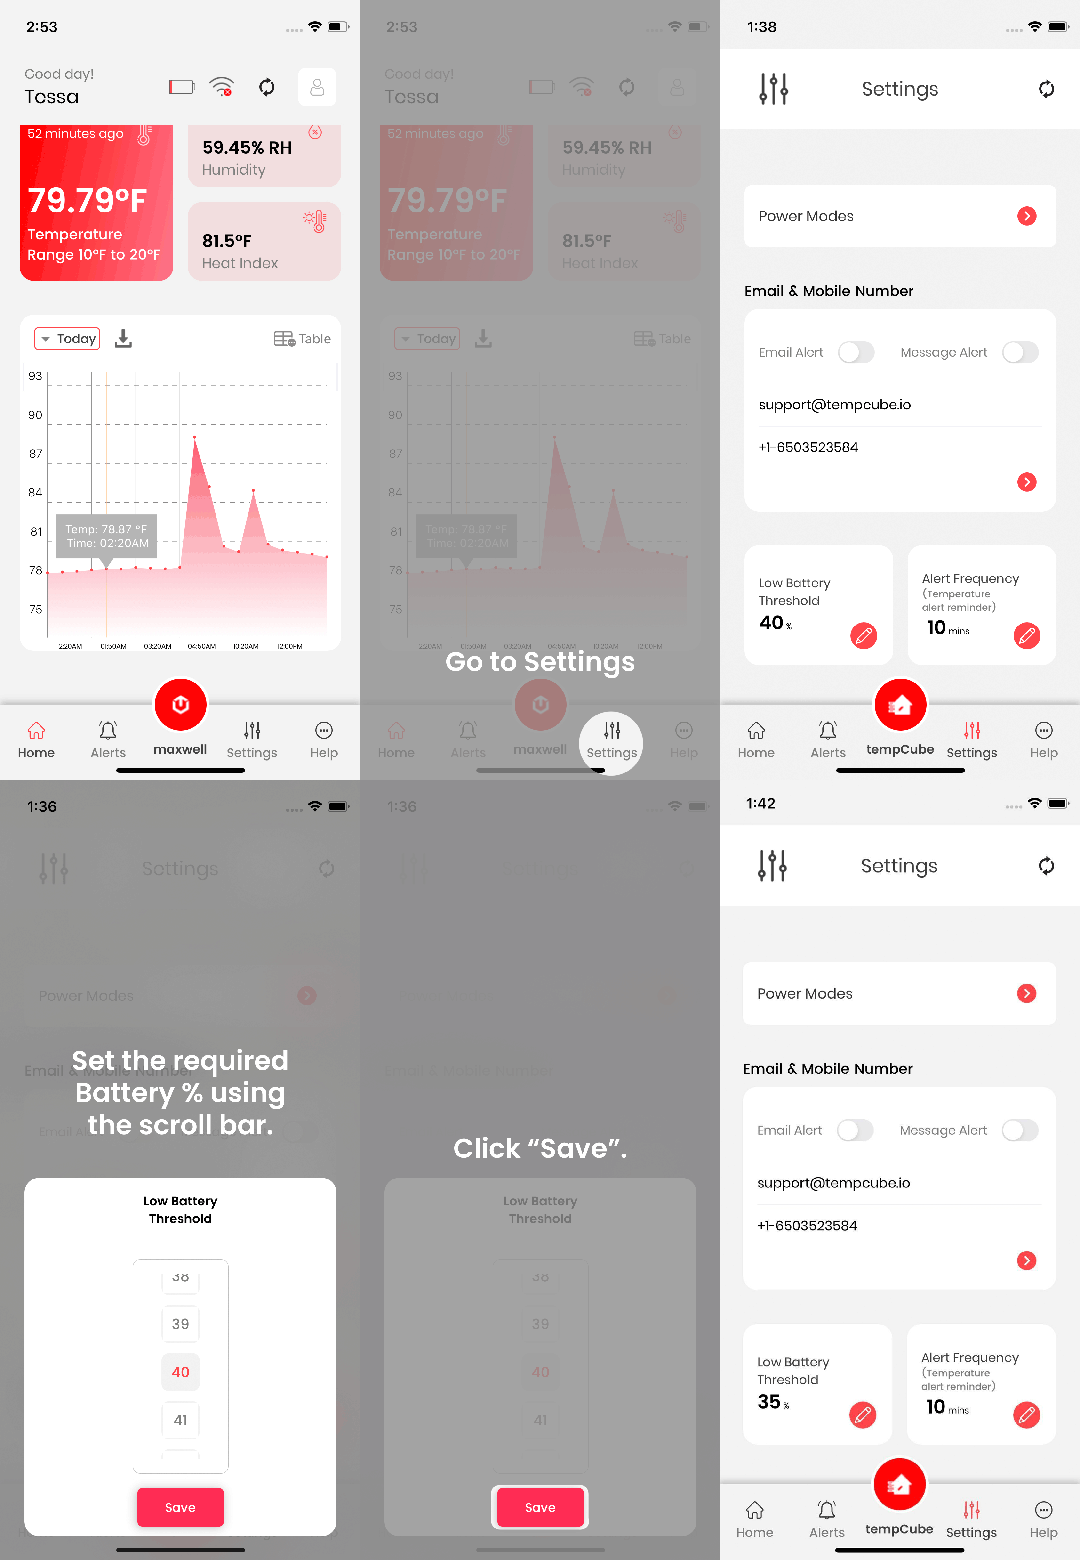
How to change the Low Battery Threshold?
- Tap on "Settings".
- Scroll down to “Low Battery Threshold” .
- Set the required Battery % using the scroll bar.
- Click “Save”.
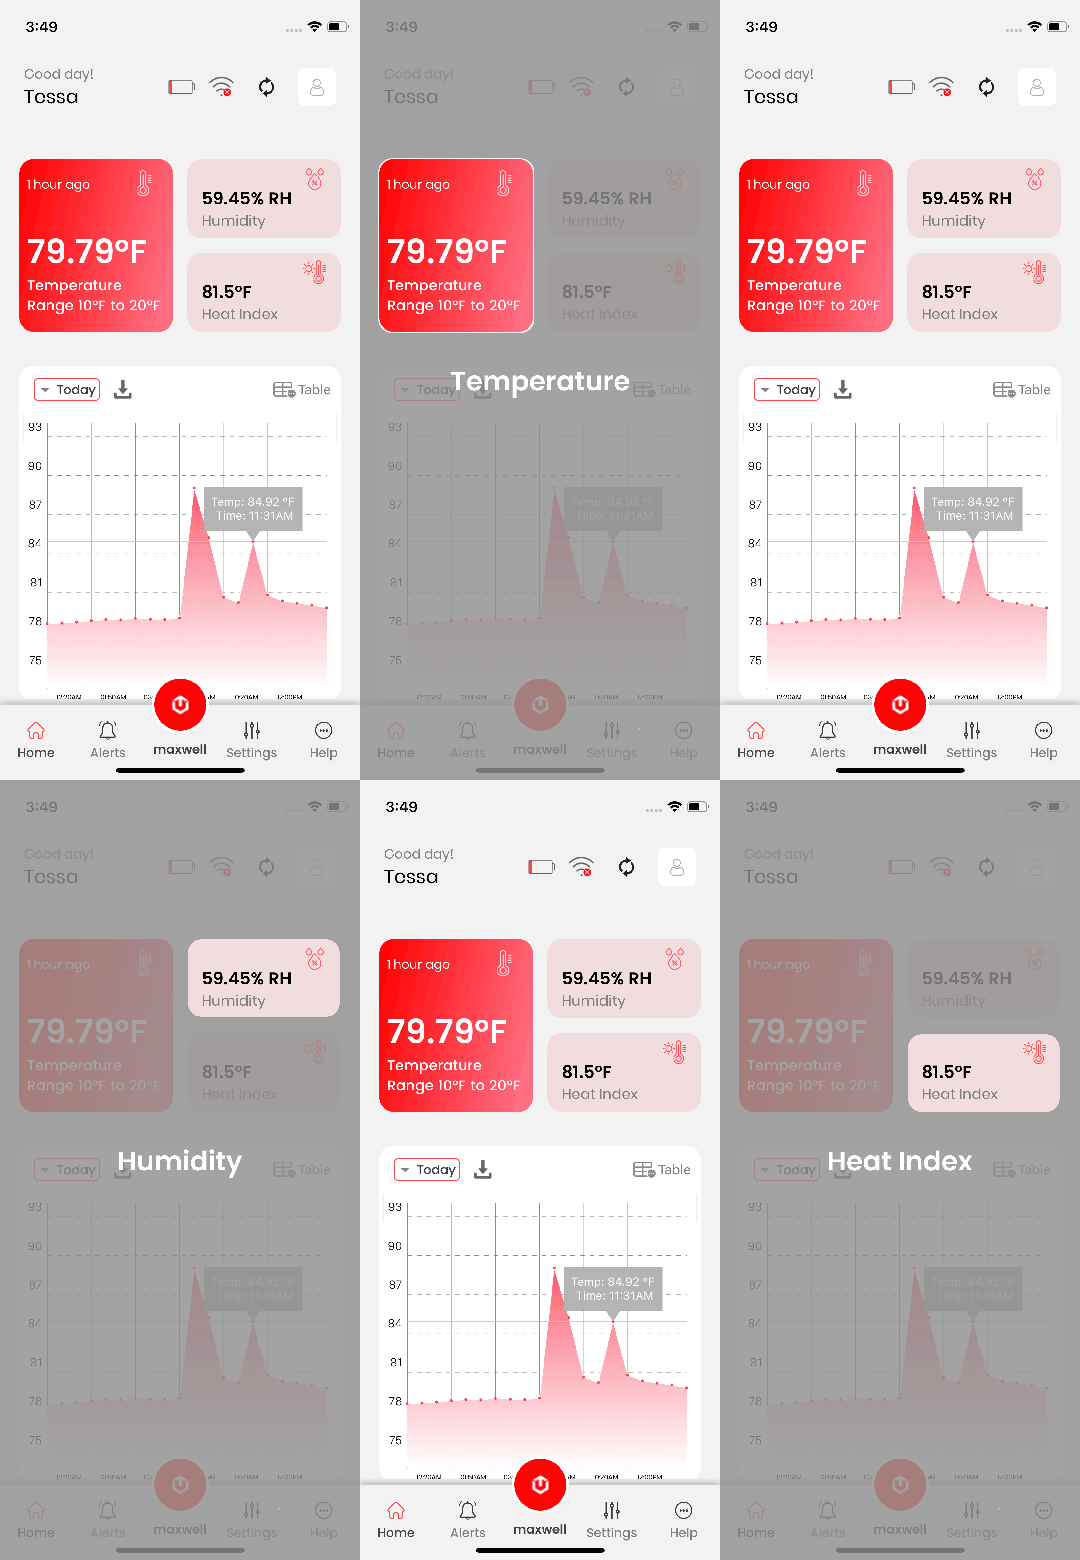
Where do I see the Temperature, Heat index and Humidity ?
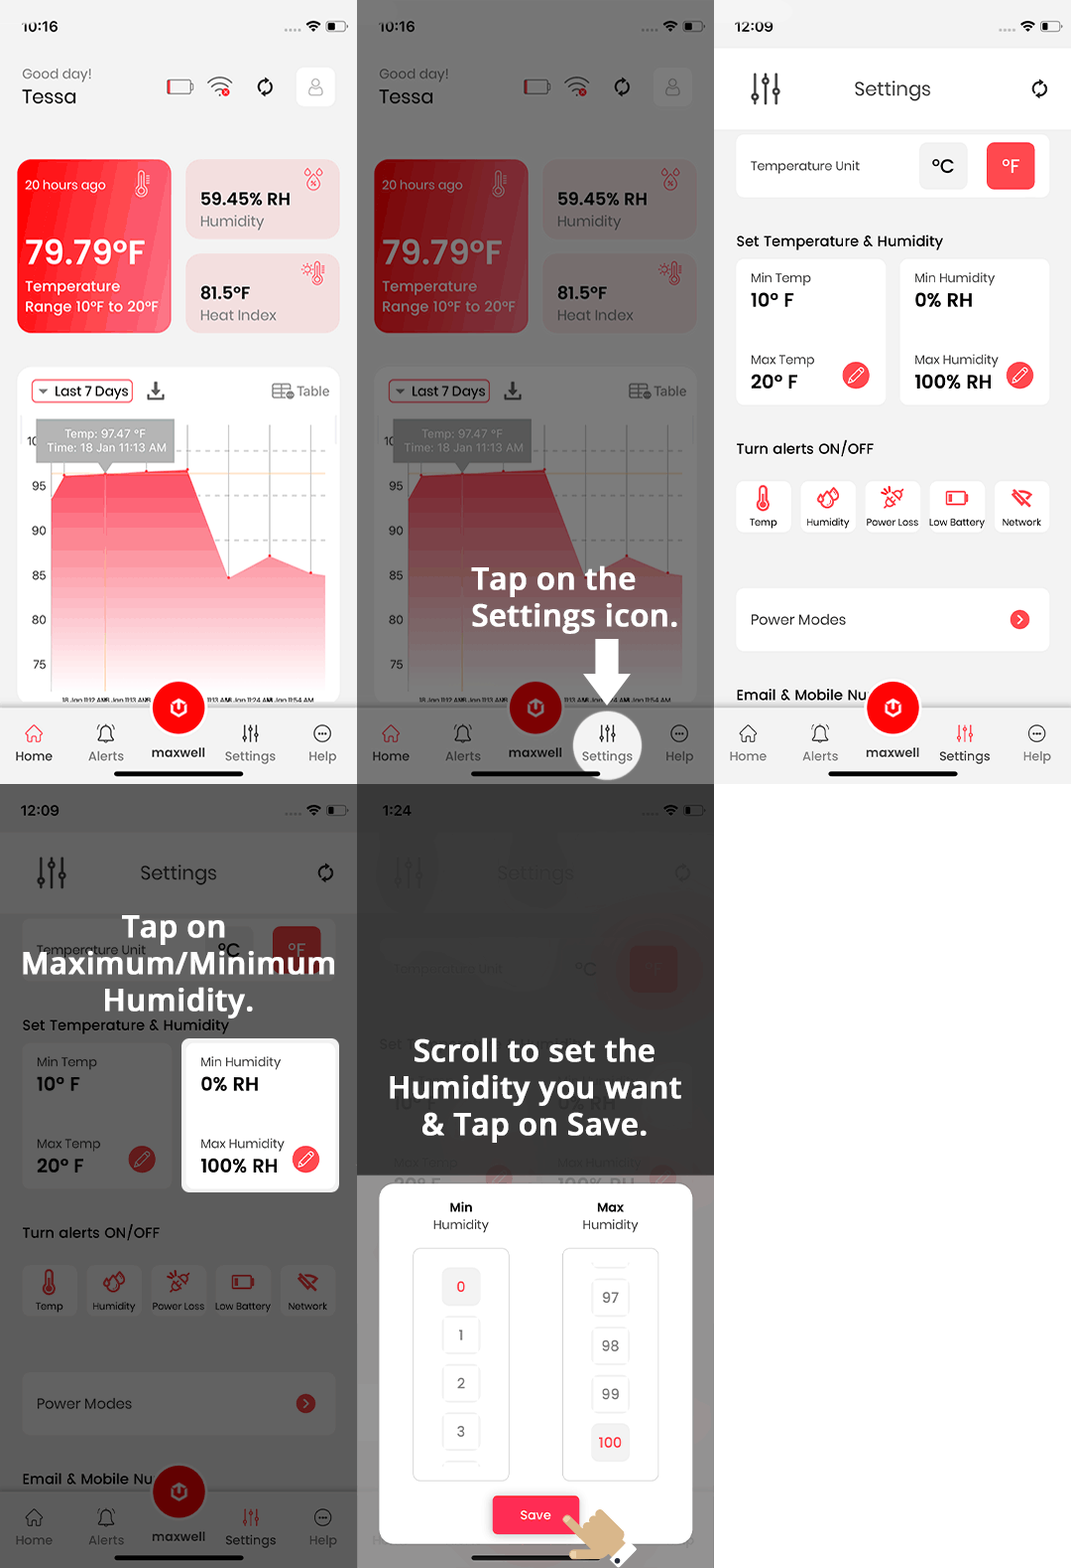
How to change the Minimum and Maximum alert Humidity?
- Tap on Settings.
- Tap on Maximum/Minimum Humidity edit icon.
- Scroll to set the Humidity you want & Tap on “Save”.
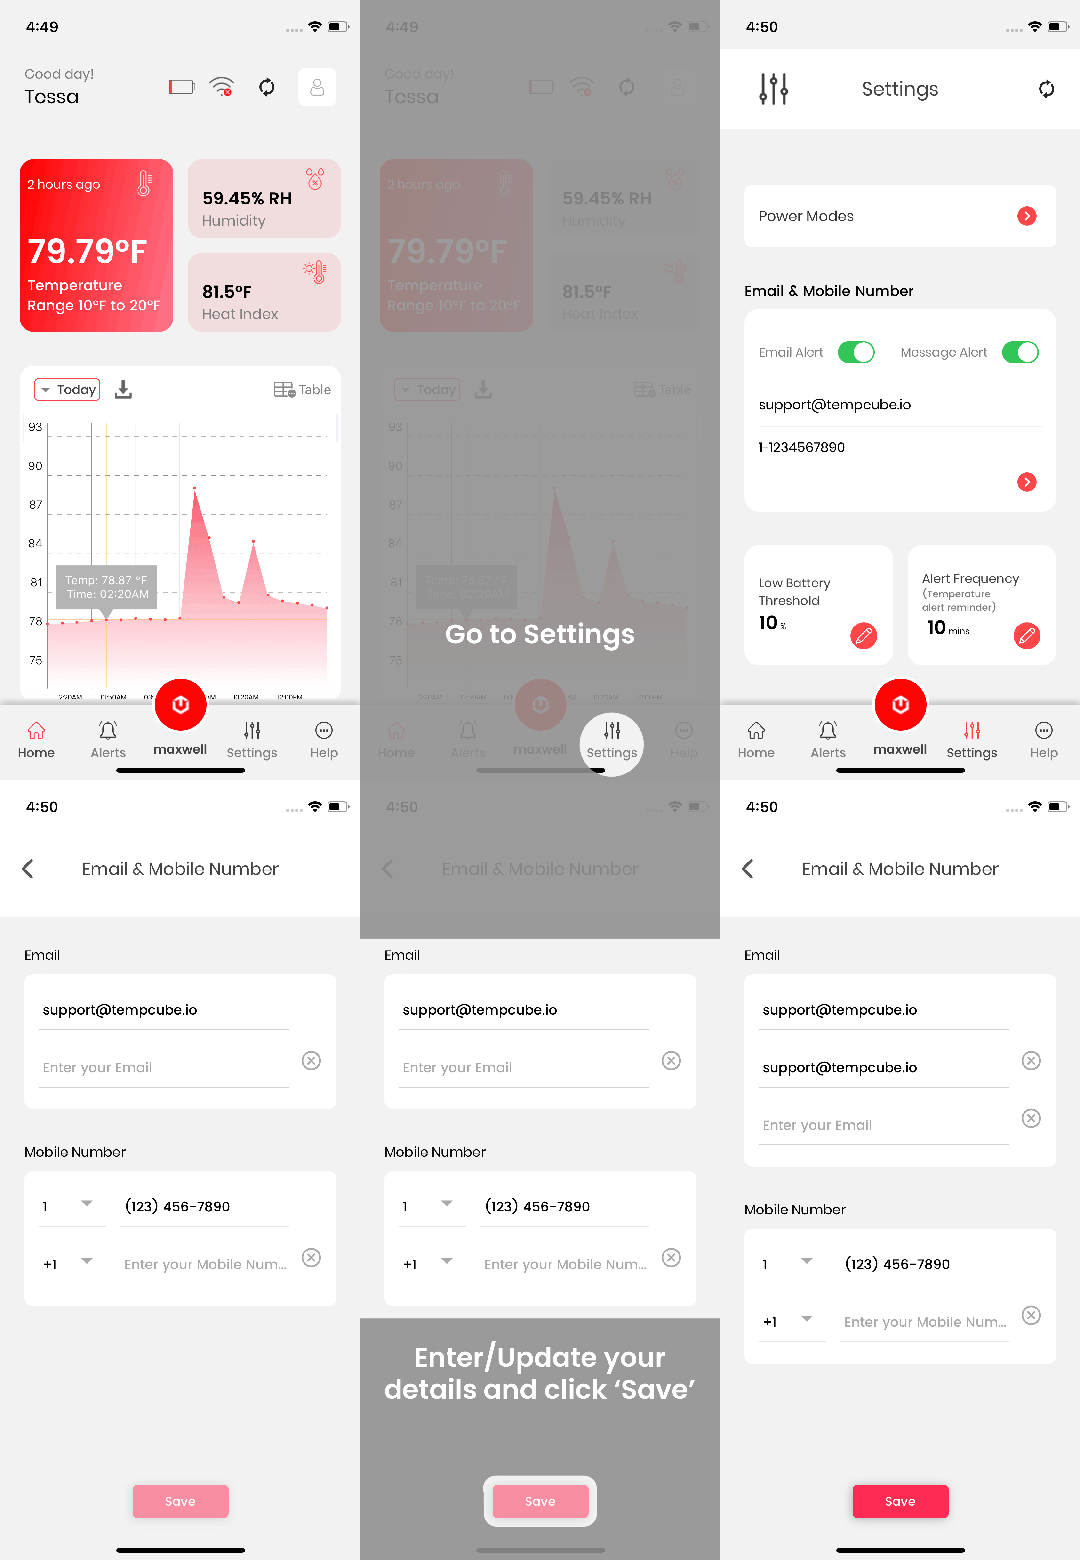
How to add/edit an email and mobile number?
- Tap on Settings.
- Under Email & Mobile Number, enter/update your details and click ‘Save’.
How does Temperature and Humidity Alert work?
tempCube will continuously monitor temperature and humidity 24/7 and send you alerts via text, email, and app when the ambient temperature or humidity goes above or below the set threshold.
How does Power Loss Alert work?
tempCube sends alerts when it runs on battery. Conditions like unplugging the device, a wholly dried battery will trigger a Power Loss Alert.
How does No Network Alert work?
tempCube will send a No Network Alert when it skips sending the alerts. Conditions like a wholly dried battery, loss of WiFi connection will trigger No Network Alert.
Will I get alerts on temperature breaches in between when the alert interval is at 2 hours?
tempCube will monitor the temperature and humidity 24/7 and send you alerts every 10 minutes when the temperature or humidity goes above/below the set point even though the alert interval is set to 2 hours.
How to change the WiFi network?
- Click the WiFi icon on the Home screen and click ‘Go to Connect.’
- Reset the device using the eject pin and ensure it is within a few feet from your phone and the router you need to connect with. (Note: tempCube will only connect with the router of 2.4GHZ)
- After pressing Reset, wait for 20 seconds for the green light to blink and click ‘Connect’ in the app. Now your app will search for your tempCube device.
- Once your device is deducted, select the WiFi network you need to connect with and enter the password.
Note:A dynamic IP will only ask for the password. Select the WiFi network for Static IP, enter the password, IP address, and hit ‘Connect.’
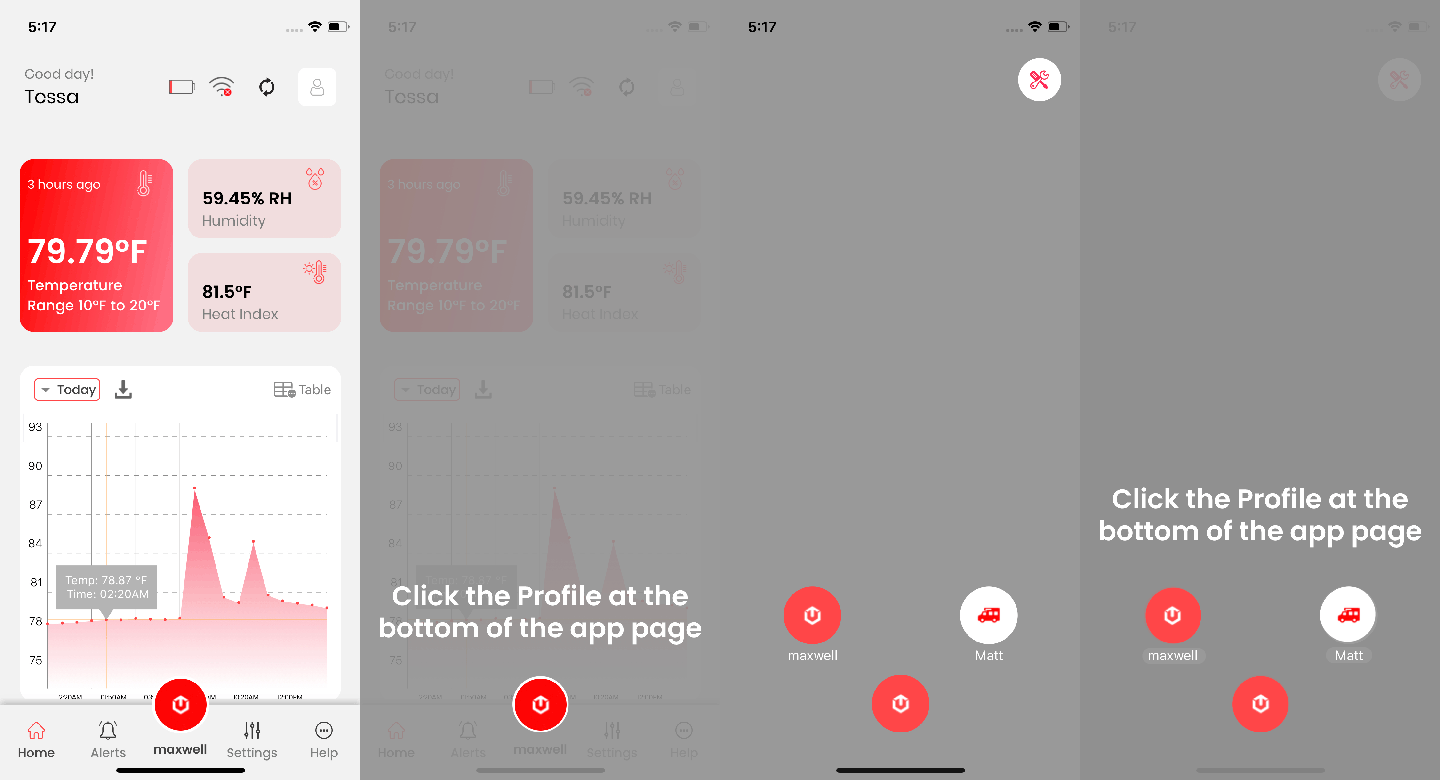
How to choose between devices in the app?
- Click the Profile at the top right corner of the app page.
- From the list of registered monitors, choose one.
(Note:You can save and switch between up to 5 monitors.)
